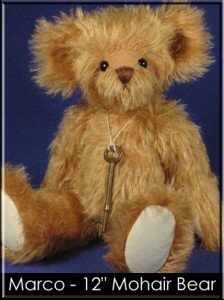
Welcome to the Marco Teddy Bear Class!
If you have any questions, you can post them in Marco’s Forum here. I visit the forum every day.
Right click to download your pattern here: Marco Pattern (Mac users, click Ctrl and click)
List of Supplies & Tools are listed on your pattern. You can check this post for some basic bear making tools.
Don’t know where to find your bear making supplies? Click here for a list of online bear making suppliers.
Need help with downloading and how to print out your pattern? How to Download and Print Out your Pattern
After you have downloaded your pattern, print the pattern pieces out on heavy paper (like card stock or half of a manila folder). Then cut your pattern pieces out cutting on the inside of the lines. Gather your tools and supplies together (they are listed on the first page of the pattern, and you are ready to begin your lessons!
Lesson Links
- Fabric prep, pattern layout, transfer markings, cut & trim seam allowances.
- Time to sew! How to hand sew video, match up pieces and start sewing, inserting & stitching head gusset and foot pads, preparing and turning pieces.
- We will start and complete your teddy bear’s head and face (except the ears).
- An overview of jointing teddy bears, then we assemble Marco.
- Almost done! We will fill his tummy, give him ears and then do finishing touches.
I hope you have enjoyed making your own Marco jointed teddy bear. I’d love to see photos of your bears! You can upload those in the forum: Class Photo